Disclosure: This article contains Amazon Associate links, which means I earn a small commission if you buy through them at no cost to you. Thanks for your support!

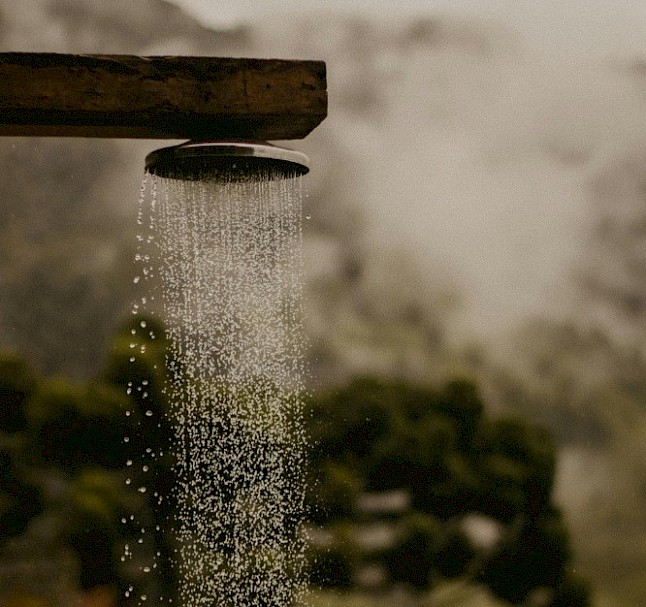
What is Greywater?
Greywater (aka grey water or graywater) is the term for any wastewater that does not include blackwater (the water that comes from your toilet and may contain dangerous pathogens). This includes water from your laundry, showers, and sinks.
How do I handle my greywater responsibly when living in a van, tiny house, RV, or in any other off-grid scenario?
Unfortunately there isn’t a lot of information out there for those who live tiny and want to know how to manage their greywater in a way that is environmentally sound, or at least the information that is out there has not yet become popular received wisdom. These living scenarios often include people who use compost or incinerating toilets to eliminate blackwater, but still have to do something with the water that comes out of their shower and sink. This article will explore a variation on one simple and affordable option that I have implemented for my own tiny home, a raised mulch basin.
Greywater safety concerns
It’s funny that people will often think nothing of washing their car in their driveway or having an outdoor shower on the back of their van, yet as soon as that shower moves a few feet into their camper and there is a few inches of drain pipe out the bottom of the floor, suddenly some people see it as potentially toxic and an environmental disaster waiting to happen.
The truth is that greywater is not dangerous or harmful as long as a few general rules are adhered to. In fact, it can be a great resource in areas of drought where it can be used to water fruit trees and ornamental plants. As with most things in our environment that we call pollutants, they are actually only pollutants because they are out of their proper place. Fertilizer in a field? Good. Fertilizer in a lake? Not so good.
Basic Greywater Guidelines
Here’s what I’ve learned:
- Be mindful of what goes down the drain
- Don’t hold on to it for too long
- Keep it away from natural water bodies, streams, and rivers
- Discharge to dry soils (Ideally a mulch basin)
- Keep it close to the ground (e.g. don’t use it for sprinkler irrigation!)
Be mindful of what goes down the drain

Thinking about what happens to our greywater makes us think more about what we’re actually putting down the drain. Even if you’re using a septic system or sewer, everything is ultimately going back into the environment—it’s just less obvious when you can’t see it. The only thing going down your drain should be water, soap, and bits of organic matter. Soaps should be fully biodegradable and phosphate free.
Eco-friendly soaps
Personally, I use Dr. Woods liquid and bar soap, and Seventh Generation laundry detergent. Some use Dr Bronners liquid soap for everything and dilute it to the strength they need, but I find it to be too drying. Dr Woods is pre-diluted and contains moisturizers like shea butter (I even make my own shampoo from this stuff!).
- Dr. Woods liquid castile soap
- Dr. Woods bar soap
- Dr Bronners liquid castile soap
- Seventh Generation laundry detergent
Don’t hold onto greywater for too long
Some people assume that greywater is dangerous and should be held in a tank for long periods of time. The irony is that holding onto greywater causes bacteria to multiply and turn it into a foul smelling soup, a sort of self-fulfilling prophecy.
If you’re nomadic, retaining greywater may be required due to campground rules or because you are camping on pavement or close to bodies of water, so temporarily storing greywater in a greywater tank is an unfortunate necessity. If you’ve been holding onto a tank of greywater in your RV or van for a while (say, over 24 hours), an RV dump station is going to be your best bet. This will be later be processed in a wastewater treatment plant.
Keep greywater away from natural water bodies, streams, and rivers

Indoor plumbing has given many people the unfortunate impression that waste streams should be diluted in water, yet this is the absolute worst thing you can do. Blackwater and greywater should never be discharged into a freshwater stream, river, lake, or a storm drain (which usually empties into a natural body of water). The reason for this is that wastewater contains nutrients which can enhance soil fertility (good), but cause eutrophication in freshwater bodies (bad), depleting oxygen in the water, poisoning aquatic life, causing toxic algae growth, and reducing water clarity. Over time, this can turn once beautiful, crystal clear bodies of water into murky, undrinkable, unswimmable, unfishable swamps.
Discharge to dry soils (Ideally a mulch basin)
Spreading greywater out and allowing it to percolate into dry or well drained soils is the ideal. Whether this happens a few feet under ground (as in a septic system leach field), or it is closer to the surface (as in a mulch basin or simple “drain out the back”), the principal is the same. The soil acts both as a physical and biological filter, breaking down and purifying the greywater before it reaches the groundwater.
Greywater should not be discharged to the pavement or to overly saturated soils where it might pool.
Keep it close to the ground
Although greywater can be used for irrigation, it shouldn’t be used with sprinkler irrigation, as this could potentially make harmful bacteria airborne. You don’t want kids playing in or rolling in greywater. Out of an abundance of caution, it is also recommended that any plants you are watering do not have edible parts low to the ground that could come directly in contact with the greywater before it has absorbed into the mulch/soil.
How is greywater usually disposed of?

In cities, greywater is mixed with blackwater and goes into a sewer system to be treated at a wastewater processing plant before being released back into the environment (such as into the ocean or a river). Alternatively (in rural areas), it is mixed with blackwater and sent to an on-site septic system, where the solid waste sinks to the bottom of a tank (eventually pumped and sent to a wastewater plant) and the liquid is dispersed under the surface of the ground into unsaturated soil above the water table, which acts as nature’s water filter, absorbing contaminants and pathogens before it re-enters the groundwater.
Downsides of traditional disposal methods
People are sometimes quick to challenge new ideas without questioning the status quo. They assume that since something has been done a certain way for a long time then it must be the right way to do it—even if they don’t actually know how it works.
In both sewer and septic scenarios, we lose what could be a valuable resource by combining it with sewage (itself also a lost opportunity, but that’s another story), when it could have been used to water the landscape. This is inefficient and costly.
Sewer systems cost an average of $25,000–$50,000 per household per connection. Septic systems can cost anywhere from $10,000 to upwards of $80,000-$100,000 in some locations, as they often require custom engineering, permitting and inspections, heavy excavation equipment, and truckloads of sand or other imported fill. They are also not truly off-grid or self-sustaining as they require yearly pumping and trucking of the solids to a wastewater plant for processing (the solids are extracted and often eventually end up in a landfill).
Over time, septic leach fields can become saturated, leading to nitrogen leaching into groundwater, contaminating drinking wells and causing algae blooms in local water bodies. This has become a major issue for Cape Cod Massachusetts, where they are currently researching and piloting alternatives including constructed wetlands, urine diversion, and advanced on-site treatment systems.
What is a Mulch Basin?

A mulch basin is typically a broad and shallow depression dug into the soil and filled with mulch. A pipe (typically buried just below the surface) carries water to one or more small housings (known as mulch shields) buried in the basin where the water is dispersed into the mulch.
Mulch basins work similarly to a septic leach field in that they use soil treatment to filter waste water. The difference is that this happens closer to the surface and the water first passes through a layer of “mulch”, a coarse, carbon-rich plant material—such as wood chips or bark—that is added to the basin to filter water, reduce odor, retain moisture, and support aerobic microbial activity that breaks down contaminants.
Because most biological activity occurs closer to the surface of the soil, mulch basins may actually be more effective than septic leach fields (and even wastewater treatment plants) at processing the greywater. The layer of organic mulch prevents standing water through fast absorption and enhances this biological activity further. It’s kind of like a compost pile for your greywater.
Mulch basins can be used for irrigation by placing them around or near trees and shrubs.
Mulch Basins are proven
A mulch basin is a proven, environmentally sound method of disposing of and/or reusing greywater. Some states, including Arizona and California, have recognized mulch basins in their state wastewater codes and allow for their construction and use in small residential scenarios without a traditional permit process. Check out Greywater Action’s Codes and Policy page for more information.
Siting a mulch basin
As previously mentioned, you want to find a dry spot for your mulch basin. Like a septic leach field, this allows the mulch in the basin and the soil below to perform its duty before the greywater reaches groundwater. Thankfully, a suitable location for a mulch basin is easier to find than one for a septic leach field, as they can be installed right at the surface (as well as the fact that the safety risks of greywater are extremely low as compared to blackwater).

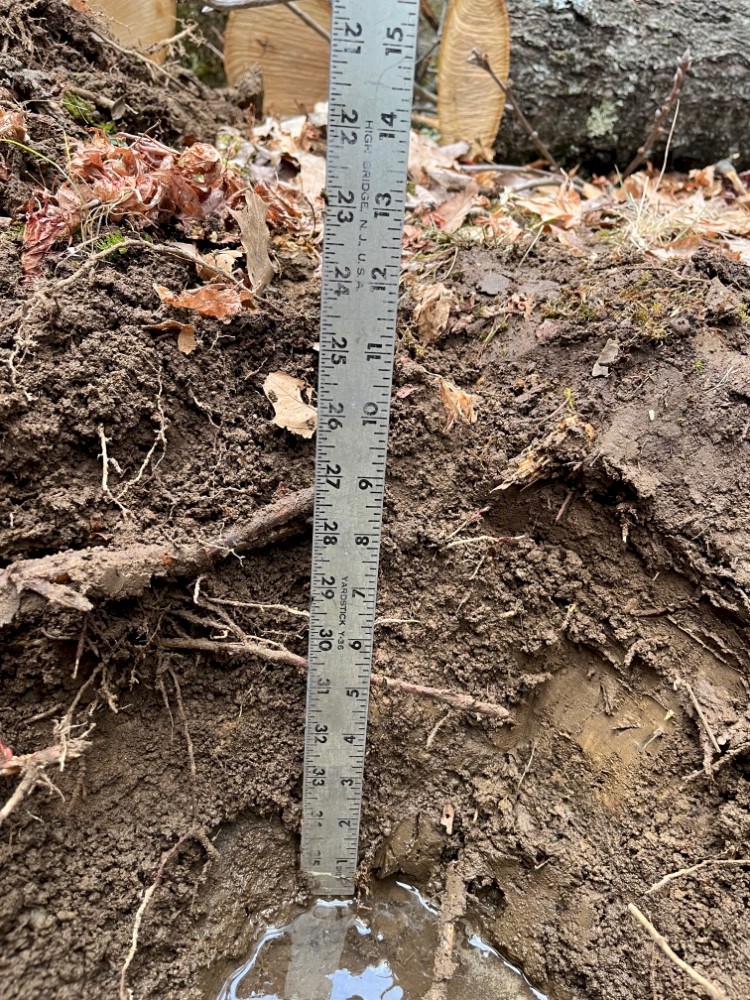
You can test a location by digging a small hole down 2-3 feet (ideally during the wettest part of the year), and seeing if it fills with water after 15 minutes to an hour. If it does, then you know you’ve reached the high water table. If it doesn’t, you can try filling it with water and seeing how long it takes to drain. If it takes less than 30 minutes per inch, then you’re probably in good shape.

I live in an area of New England with a very unusually high water table. Even in the driest spot I could find, I hit water at about 12 inches below the surface. This meant I needed to think creatively.
My raised mulch basin design

The solution I came up with was to build my mulch basin above ground. It’s a simple, 4-walled structure open at the top and bottom and filled with mulch.
Because my location obviously does not lack for water, my goal was simply responsibly returning the greywater to the environment, rather than irrigation. Still, I decided to top off the mulch bed with native ornamental plants to further absorb excess moisture, provide filtration, and enhance beauty of the system—sort of like a raised garden bed.
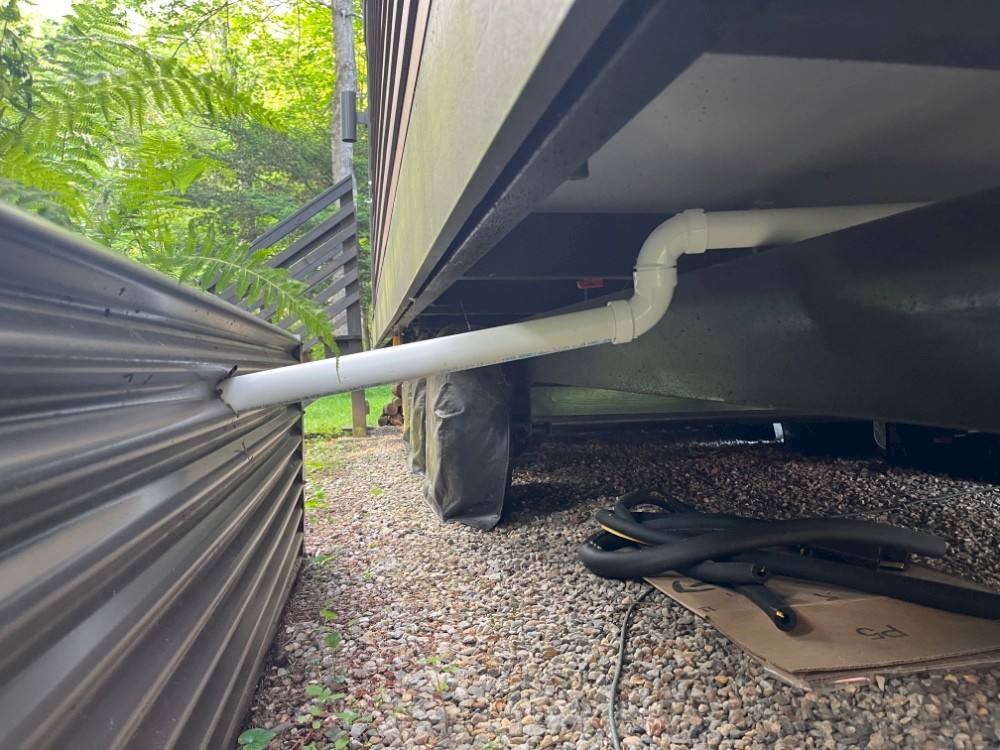
Siting it directly next to the house (the driest spot I could find) allows for a short, direct, well sloped run of drainpipe. It also serves as a partial skirting for the tiny house and will hopefully add to the beauty when the ornamental plants take.
Sizing
I went with a single basin, 3ft wide x 8ft long x 26 inches tall.
Because I’m a household of one, I decided to keep it simple and start out with a single mulch shield for distributing the greywater, as opposed to a branched system that would split the flow and distribute it to multiple shields in the basin. However, this design could easily accommodate a second shield, if I later discover it to be necessary to avoid pooling.
For more information on sizing a system (and much more), The New Create an Oasis with Greywater 6th Ed is an excellent resource.
Putting together the walls of the basin
I had leftover corrugated galvalume roofing and downspout material from my tiny home construction, so I was able to make use of this resource to build walls for my basin that matched the aesthetic of my home for no additional cost. Obviously I got lucky here since I already had what I needed, but it’s always worth checking Facebook Marketplace, Craigslist, and your local “Buy Nothing” group on Facebook to see if someone is giving away what you’re looking for or offering it at a major discount.
Cedar decking boards was another option that I considered. These would be breathable, environmentally sound and rot resistant, but expensive and would still eventually rot and need to be replaced. Other options for the walls could include concrete blocks / pavers or corrugated plastic.

I marked and cut the galvalume panels down using a high quality pneumatic nibbler. For the corner pieces, I used some pieces of heavy duty downspout which I cut lengthwise to create 2 right angle pieces. I attached them to the corrugated walls with roofing screws.

I leveled off the ground the best I could using a shovel and a large carpenter’s level, and moved the structure in place. Then I dug a shallow depression in the middle, pushing a bit of soil up around the walls, with the thought that this will help to keep the water contained within the basin when it is heavily saturated (rather than leaking out the sides around the bottom).
I used a 2 1/2” hole saw to make a hole in the back of the rear panel (centered about 5” down from the top of the basin) for the 1-1/2” PVC drain pipe to enter the basin. Please use eye AND EAR protection when doing this! I think my parents thought the rapture had come when they heard me doing this.
Plumbing

Achieving a consistent slope for the drain pipe was a bit tricky since my trailer had a large structural member right where the drain pipe would ideally pass through. However, by cutting back my drain pipe with an angle grinder and using the tightest 90 degree fitting I could find, I was able to maintain a healthy slope to the top of the steel member, and then use a couple more fittings to drop the pipe down to its final destination.

I had some leftover 1-1/2” PVC that I used for this project (I only needed about 6 feet). In my case I didn’t even end up needing any PVC glue. Dry fitting everything was sufficient and will allow me to make later changes if necessary, and easily disconnect when I need to move my tiny home. If small leaks happen, it’s no big deal since the plumbing is all outdoors.

The mulch shield
The idea is to have your drainpipe enter the mulch basin inside of a housing called a mulch shield. The purpose of the mulch shield is to prevent the pipe from clogging, and to allow it to be inspected if needed.

You can buy pre-made irrigation boxes for this, but they’re a bit pricey for what they are and would still require modification. I used a simple 5 gallon bucket from Lowe’s with a watertight, flexible cover and cut off the bottom with an angle grinder, leaving about 11” total height. I then used a 2-1/2” hole saw centered about 5” down from the top rim of the bucket for the drain pipe to enter. I also drilled 3 rows of 1/2” diameter holes in the sides of the bucket to allow water to seep out into the mulch from the sides in the event that a large surge of water fills the mulch shield.
You will need to fill up the basin with mulch (at least part way) before actually installing the mulch shield.
Filling the basin
You shouldn’t need to pay to get mulch. Arborist wood chips are ideal. I used a mix of materials I found on my property (pine cones, pine needles, leaves, wood shavings, small branches processed by my little electric wood chipper, cardboard eco packing peanuts (yes, really), and free wood chips from a pile at the local town transfer station. Do some asking around as some towns have free communal mulch piles and many tree services / arborists are happy to get rid of extra wood chips.

A mix of leaves, pine cones, small sticks, and pine needles from my property. All sorts of organic matter can work, but coarser is better (you want to leave air gaps). Avoid using too many leaves, too much fine saw dust, or using pure soil.

Cardboard “eco packing peanuts” from a printer I just bought (!)

Getting closer…

Mulch shield in place…

Full! I used the mulch from the local transfer station for the top layer of the basin, for a nice, uniform look.
Adding to the beauty
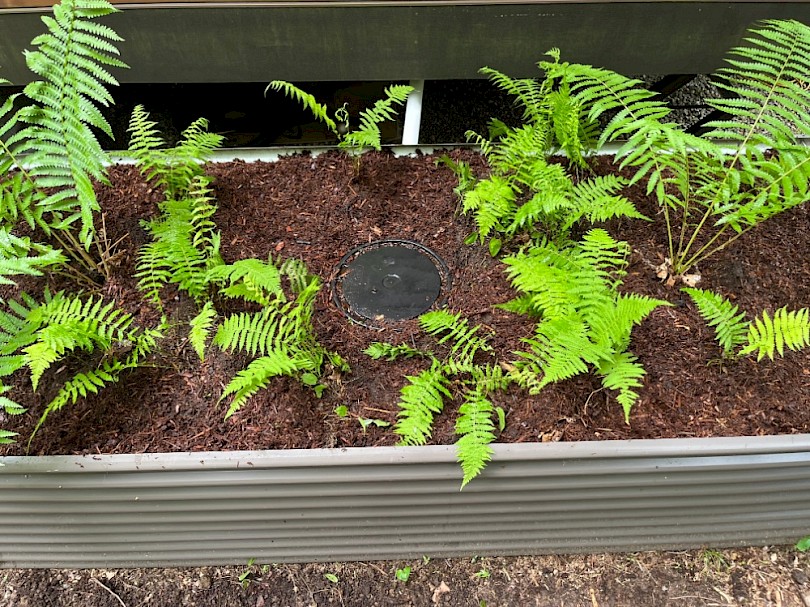
After one failed attempt at sprouting some ornamental grasses (fox sedge) from seed, I decided to work with what I already had and transplant some native ferns from the woods in my backyard. I love ferns, and they should take well in this moist and shaded location. I transplanted two large Cinnamon Ferns, surrounded by a group of smaller New York ferns. The New York ferns should spread to fill in the gaps. I left a decent root ball of soil around each planting, figuring the ferns would prefer having some soil to growing directly in the mulch.

What about greywater in the wintertime?
How this system will perform in the wintertime remains to be seen. My plan is to cover the top (and possibly the sides) of the basin with straw bales to provide insulation. I also plan to wrap the exposed drainpipe with EPDM rubber insulation (to cover 1-1/2” drain pipe requires 2 pieces—1/2” and 3/4”—stuck together).
If leaving the greywater drain open all the time results in freezing, one possible solution is to retain greywater in a (insulated) on-board tank and empty it only once per day (ideally right after you shower or otherwise use a lot of warm water). If you have a simple “drain out the back” this prevents your drain pipe from freezing solid. The same principle may work for the mulch basin.
Once the freezing temperatures hit, I’ll be sure to provide an update.
Total Spend: $50
Your mileage may vary since I had many of the materials I needed on hand, but the point is that a mulch basin can be very inexpensive.
To help ensure accuracy, I had this article reviewed by Ryan Smith, a wastewater industry professional and ecosan advocate.
References and Further Reading
- Greywater Action
- Greywater FAQ (Greywater Action)
- Greywater Codes and Policy (Greywater Action)
- Oasis Design
- Common Grey Water Errors and Preferred Practices (Oasis Design)
- Branched Drain Greywater Systems (Oasis Design)
- The New Create an Oasis with Greywater 6th Ed (Book)
- Water Efficiency and Sanitation Standard (WE-STAND)
- Massachusetts Alternative Septic System Center
Are you a tiny house dweller, van-lifer, off-grid enthusiast, or full-time RVer? Did this article help you? Let me know in the comments below.


Categories: Eco Sanitation (Ecosan), Simple Living, DIY Projects
Comments: 1 Comment
Comment
Comment by Jon on 13 June 2025 2:23 am
Superbly informative treatise on a subject very new to me! Thanks! I get the whole picture well now. Especially good photos!
Post a comment